
A First-Person Game in 2KB
Introduction
On first glance, making a first person game without an engine or a graphics API seems like an almost impossible task. In this post I'll show you how to do that using a simple variant of a method called ray casting.
My goal here is to show how something that looks complicated can be broken down into simple pieces, and if I've done my job right, it should feel like you've discovered how the game works.
First, we'll explore how the algorithm behind the game works, then we'll write it out line by line. Afterwards, we'll take a second look at the code to add some features and optimize it for size. I've tried to make this as accessible and friendly as possible but a healthy understanding of programming as well as Rust and basic geometry will help.
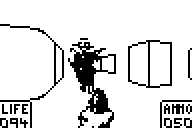
Here's a quick preview of what we'll be making:
If you just want to see the source code, you can check out the Github repository.
My first experience with games like this (though I didn't know at the time), was in middle school with games like zDoom on my calculator. zDoom (while not actually that fun), was fascinating to me because it could (kind of) create the illusion of depth and perspective, something I thought only "real" games could do.
zDoom was only an imitation of the original game Doom, in reality, it was much closer to Doom's predecessor, Wolfenstein 3D.
Wolfenstein 3D
Famously, Wolfenstein 3D, released in 1992, was one of the first 3D first-person games to run on consumer PCs. Back then, computers didn't have hardware 3D acceleration, let alone dedicated graphics cards, so how was this done?
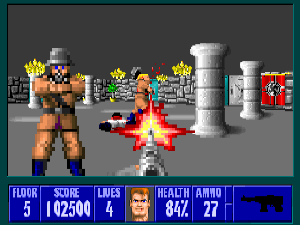
Well, I should have said pseudo-3D because no part of the game ran in three dimensions. The core of the game was an algorithm called ray casting[^1], a process of projecting a 2D game into a 3D perspective.
All the game entities were located at simple x and y positions on the map and could not move vertically. Upon release, I'm sure that this didn't matter, but with our current standards, it shows its age. The player could not look up or down, let alone crouch or jump.

To add to that, all the levels were composed of single floors of buildings with no windows. Also, all walls were perfectly straight with corners placed at even intervals (something that will absolutely not come up later). These design features were all put here because of some of the essential restrictions of its simple ray-casting algorithm.
The Algorithm
The Basics
At the most fundamental level, ray casting depends on the simple fact that objects that are further away from us appear smaller while objects that are closer appear larger. Ray casting uses this fact to draw walls at shorter heights the further away they are from the player and at taller heights the closer they are.
Just this simple idea alone creates a convincing illusion of depth and allows us to move our player around just as if it were being rendered in actual 3D.
Ray casting works by tracing a path from the player to the closest wall for each column in the player's view. It then records the distances of each path before converting it into the height of a wall and drawing it on the screen as a vertical line.

From what we know so far about the ray casting algorithm we can deduce that we will need to:
- Cast a ray from the player and stop at the nearest wall
- Calculate the distance from the player to the nearest wall
- Convert that distance into the height of a wall and draw it on the screen
- Repeat that for each column on the screen ↺
Digging Deeper
The hardest part of this is "cast a ray from the player and stop at the nearest wall". This seems simple on paper but in practice, it can be pretty difficult. If you had to come up with a ray casting implementation yourself, how would you approach it?

The first idea most people would probably have is to repeatedly extend the ray[^2] a small amount and stop when it hits a wall. This is problematic because we might skip over the wall entirely when extending the ray. And if the ray does hit the wall correctly it will have very low accuracy because it won't know exactly where the wall started, just that it landed in one.

What we need is to find a way that we can guarantee that the ray will intersect with a wall and that it will stop right on the border of that wall. In math land, we might be able to do this by extending the ray an infinitely small distance infinitely many times. Sadly, we're not in math land so we can't do that.
The solution to this, as you might have guessed from the earlier foreshadowing, is to align all the walls to a grid. If we know that the walls fall at predictable intervals we can calculate a reliable distance to extend our ray each time.

But how will the ray jump to the wall?
If you get out some grid paper and sketch out the lines between the player to various walls you'll start to notice some patterns. Ray "extensions" on their way to walls on horizontal grid lines all share a common width while ray "extensions" that land on walls at vertical grid lines all share a common height.
Once we extend the ray to the first grid line we can calculate these shared "extension widths" and "extension heights". Then we repeatedly extend it by these widths and heights to get the closest "vertical wall" and "horizontal wall" then use the smaller of the two distances.
I admit this is a bit confusing so I'll explain what this means in more depth:
Horizontal Intersections
Here's an example diagram of what it looks like when a player looks at a "horizontal wall". This diagram is interactive, try dragging around the player!
Notice how only the width between extensions changes when the player moves.
In horizontal wall intersections the height between "extensions" is always one, while the width between extensions can be derived from the angle of the ray. We always move up or down by exactly one and right or left by an amount determined by the angle of the ray.
You can see this by looking at the diagram, the width between $A_x$ and $B_x$ is the same as the width between $B_x$ and $C_x$, and the difference in height between all the points is just one.
Using some simple trigonometry we can find the width between horizontal grid intersections from the angle of the player. I'm going to save you the work and just give you the definition:
$$ \Delta H = \begin{cases} 1 &\text{if "facing up"} \\ -1 &\text{if "facing down"} \end{cases} $$ $$ \Delta W = \frac{\Delta H}{\tan(\theta)} $$
Vertical Intersections
Here's another interactive diagram of what it looks like when a ray intersects with a "vertical wall".
Here the height between extensions changes while the width stays the same.
Vertical grid intersections are the same as horizontal grid intersections, just rotated 90°. In vertical grid intersections the width between our "ray extensions" is constant while the height is created from the angle of the ray. Like last time, I'm going to skip ahead and define our variables for you.
$$ \Delta W = \begin{cases} 1 &\text{if "facing right"} \\ -1 &\text{if "facing left"} \end{cases} $$ $$ \Delta H = \Delta W * \tan(\theta) $$
Summary
Now that we know pretty much exactly how we'll do this we can compile it into a more detailed step-by-step list for our program to execute on each frame.
For each column on the screen:
- Find the angle for the ray from the player's angle and field of view.
- Determine the distance to the nearest wall that the ray intersects with:
- Get the first "horizontal" wall the ray intersects with.
- Get the first "vertical" wall the ray intersects with.
- Calculate the distance to the wall from the closest of those two.
- Convert that distance into the height of a wall on the screen and then draw it.
Implementation
Now that we understand how the underlying algorithm works we can write a program that implements it using WASM-4.
Wait why WASM-4? The official answer is that we need a way for our program to accept user input and draw to the screen. The real answer is because I like it a lot.
WASM-4 is a tiny game engine that runs WebAssembly (.wasm) files.
Most compiled programming languages (C, C++, Rust, Zig, etc.) can compile to WebAssembly which means games for WASM-4 can be written in any of those languages!
WASM-4 is extremely minimal, the "4" in "WASM-4" is there because you can only draw four colors on screen at once.
I'll be using Rust, but you could follow along with any language that can compile to WebAssembly. If you're more familiar with JavaScript I recommend AssemblyScript.

WASM-4 will let us create tiny games because it provides a simple platform to build off. WASM-4 handles windowing, graphics rendering, and gamepad input, we have to do everything else.
Here are the specs for the WASM-4 "fantasy console" from the website:
- Display: 160x160 pixels, 4 customizable colors, updated at 60 Hz.
- Memory: 64 KB linear RAM, memory-mapped I/O, save states.
- Cartridge Size Limit: 64 KB.
- Input: Keyboard, mouse, touchscreen, up to 4 gamepads.
- Audio: 2 pulse wave channels, 1 triangle wave channel, 1 noise channel.
- Disk Storage: 1024 bytes.
If you know a bit about computer hardware you'll know this is an incredibly restrictive environment for a game to run in. That's the fun of it though, seeing how much you can cram into 160x160px, 4 colors, and 64KB of disk space. If you want to see what people are able to create with it, check out the WASM-4 site for some very impressive games (including a flight simulator!).
I'll probably make a more in-depth post on WASM-4 in the future, but for now, this explanation should be good enough for our case. All you need to run WASM-4 games is to download and install the minimal runtime.
Project Setup
First, make sure the Rust toolchain for wasm32-unknown-unknown is installed:
$ rustup target add wasm32-unknown-unknown
Because WASM-4 runs WebAssembly files we have to configure our project to create one.
$ cargo new raycaster && cd raycaster
Add this to to Cargo.toml:
[profile.release]
opt-level = "z"         # optimize end .wasm file for size
lto = true              # enable link time optimizations
codegen-units = 1       # compile crates one after another so the compiler can optimize better
strip = true            # strip expensive panic clean-up logic
panic = "abort"         # remove debug symbols

[dependencies]
libm = "0.2"            # import libm for no_std math functions
In the crate configuration file .cargo/config.toml, add:
[build]
target = "wasm32-unknown-unknown"

[target.wasm32-unknown-unknown]
runner = "w4 run-native"
rustflags = [
    "-C", "link-arg=--import-memory",
    "-C", "link-arg=--initial-memory=65536",
    "-C", "link-arg=--max-memory=65536",
    "-C", "link-arg=-zstack-size=14752",
]
This will tell cargo to use WebAssembly as the default target and to pass some flags to rustc that tells our program to reserve some memory for WASM-4.
Now, let's add some simple WASM-4 boilerplate to the main source file src/main.rs:
#![no_main]
#![no_std]

use core::{arch::wasm32, panic::PanicInfo};

const GAMEPAD1: *const u8 = 0x16 as *const u8;

const BUTTON_LEFT: u8 = 16;  // 00010000
const BUTTON_RIGHT: u8 = 32; // 00100000
const BUTTON_UP: u8 = 64;    // 01000000
const BUTTON_DOWN: u8 = 128; // 10000000

extern "C" {
    fn vline(x: i32, y: i32, len: u32);
}

#[panic_handler]
fn phandler(_: &PanicInfo<'_>) -> ! {
    wasm32::unreachable();
}

#[no_mangle]
unsafe fn update() {
    if *GAMEPAD1 & BUTTON_UP != 0 {
        vline(80, 20, 120);
    }
}
Here's a little explanation of the code here for those who aren't familiar with Rust or WASM-4:
-
#![no_std]prohibits the program from accessing the Rust standard library. This is essential in almost all WASM-4 games because the standard library is large and might put our game over the 64KB size limit. -
GAMEPAD1is a pointer to the current state of the first gamepad (the arrow keys in our case). The runtime will update this section of memory with the state of our gamepad (keyboard) on each frame. -
The constants
BUTTON_LEFTthroughBUTTON_DOWNdescribe the bits in the gamepad which describe each button. We can use these to check ifGAMEPAD1says that a button is down, that's what we're doing when we call*GAMEPAD1 & BUTTON_UP != 0. -
extern "C" fn vlinelinks our game to an external function WASM-4 provides for us,vline.vlinedraws a vertical line on the window atx,yand extends it downlenpixels. -
#[panic_handler] fn phandleris a little bit of boilerplate that Rust requires we provide if we choose to use#![no_std]. This function will run when the program panics. Because WASM-4 is such a restrictive environment the only thing we can really do is callwasm32::unreachable(). -
unsafe fn updateis the main entry point into our program, WASM-4 calls this function on each frame.
To compile and run our game we can build it just like any other crate:
$ cargo run --release
This will launch an empty window, and if we press the up arrow on the keyboard a vertical line will appear in all its green Gameboy-ish style.
Great, now that we've got the workflow down we can get to writing the game.
Storing The Map
The simplest way to store the map is a grid of wall or no wall. One way we could store the map as [[bool; WIDTH]; HEIGHT] and access it through map[][].
Storing the map this way wouldn't be very elegant because we'd have to type out each cell individually as a true or false.
Because the boolean value (wall or no wall) can be represented by a single bit we can use the bits inside of a number to represent the map: [<int>; HEIGHT].
In this case, [u16; HEIGHT] can represent a map with a width of 16 cells and an arbitrary height of our choosing.
Using Rust's integer literal syntax we can represent our map pretty simply by writing a 1 where there is a wall and a 0 where there is no wall:
const MAP: [u16; 8] = [
    0b1111111111111111,
    0b1000001010000101,
    0b1011100000110101,
    0b1000111010010001,
    0b1010001011110111,
    0b1011101001100001,
    0b1000100000001101,
    0b1111111111111111,
];
The more difficult thing about this way of storing the map is accessing it. To do this we have to write a function that first indexes into the row then into the specific column by masking and then shifting the row. This post is already long as it is so for the sake of time I'm not going to go in-depth about how the X coordinate lookup bit operations works in this function.
/// Check if the map contains a wall at a point.
fn point_in_wall(x: f32, y: f32) -> bool {
    match MAP.get(y as usize) {
        Some(line) => (line & (0b1 << x as usize)) != 0,
        None => true,
    }
}
Because our map is surrounded by walls it's safe to tell the caller of this function that there is a wall if it calls for a coordinate that is out of bounds.
Maintaining Game State
The map stays constant throughout the runtime of the program, but the player's position and angle change.
Because WASM-4 calls update on each frame the only way to store our game state across frames is via something like Rust's static mut.
Because static mut is unsafe we should consolidate our game logic and state in a single struct so we minimize the number of times we modify our state through static mut.
Only three variables are required to describe the player's view: the X and Y position and viewing angle.
struct State {
    player_x: f32,
    player_y: f32,
    player_angle: f32,
}
Now let's initialize a State in a global static mut:
static mut STATE: State = State {
    player_x: 1.5,
    player_y: 1.5,
    player_angle: 0.0,
};
player_xandplayer_yare both initially set at 1.5 so the player starts in the center of a cell and not inside a wall.
Not only is accessing State unsafe behavior, most interactions with are WASM-4 are. (dereferencing raw pointers, calling external functions, etc.)
For those not familiar with Rust, unsafe is a keyword/block that you give the compiler when you need to get around its memory safety guarantees.
Using unsafe tells the Rust compiler "I know what I'm doing, don't bother me about it".
The problem is that often we don't know what we're doing.
Because of this, best practice is to keep unsafe usage to a minimum.
If we consolidate unsafe behavior into fn update and game logic into State we isolate our state and give some structure to our program.
This gives us a pretty clear line: unsafe I/O with WASM-4 in fn update, safe game logic in State.

Moving the Character
One of the easier parts of this game is moving the character.
Because accessing our STATE from outside is unsafe, let's create a method inside of State to move the character and pass in the inputs on each frame.
impl State {
    /// move the character
    pub fn update(&mut self, up: bool, down: bool, left: bool, right: bool) {
        // store our current position in case we might need it later
        let previous_position = (self.player_x, self.player_y);

        if up {
            self.player_x += cosf(self.player_angle) * STEP_SIZE;
            self.player_y += -sinf(self.player_angle) * STEP_SIZE;
        }

        if down {
            self.player_x -= cosf(self.player_angle) * STEP_SIZE;
            self.player_y -= -sinf(self.player_angle) * STEP_SIZE;
        }

        if right {
            self.player_angle -= STEP_SIZE;
        }

        if left {
            self.player_angle += STEP_SIZE;
        }

        // if moving us on this frame put us into a wall just revert it
        if point_in_wall(self.player_x, self.player_y) {
            (self.player_x, self.player_y) = previous_position;
        }
    }
}
If you've ever moved a player in a game and know some basic trigonometry this should all look familiar.
Note that calls to sinf are negative because our Y-axis is flipped.
If the player is asking us to move the player forwards or backward we modify the player's x and y positions based on the cosf and sinf values of the player's angle multiplied by a constant STEP_SIZE.
Just for you, I'll give you a magic number that works pretty well. You can change later it if you'd like:
const STEP_SIZE: f32 = 0.045;
The last thing that we need to make this function work is to import cosf and sinf from libm.
use libm::{cosf, sinf};
Why
sinf/cosfand notsin/cos? This naming convention comes from C's libm wheresin/coshandles doubles andsinf/cosfhandles floats. In Rust's implementation oflibmthis meansfn cos(x: f64) -> f64andfn cosf(x: f32) -> f32. We're usingf32and notf64here because it saves space and we don't need the precision.
The last thing we need to do... is call our new State::update of course!
#[no_mangle]
unsafe fn update() {
    STATE.update(
        *GAMEPAD1 & BUTTON_UP != 0,
        *GAMEPAD1 & BUTTON_DOWN != 0,
        *GAMEPAD1 & BUTTON_LEFT != 0,
        *GAMEPAD1 & BUTTON_RIGHT != 0,
    );
}
Horizontal Intersections
Before we draw the walls on the screen we need to implement the core of our algorithm: horizontal and vertical intersection checks.
First, we need to expand our libm import statement from earlier:
use libm::{ceilf, cosf, fabsf, floorf, sinf, sqrtf, tanf};
Using libm::sqrtf we can make a distance function $ D = \sqrt{(\Delta X^2)+(\Delta Y^2)} $:
fn distance(a: f32, b: f32) -> f32 {
    sqrtf((a * a) + (b * b))
}
Then, lets import the core library's helpful constants for $\pi$ and $\frac{\pi}{2}$:
use core::f32::consts::{PI, FRAC_PI_2};
Because we need to access the player's angle and position, let's create a method inside of State called horizontal_intersection.
This is the most complex function we've written so far, but it mirrors the algorithm I've already described so I'm going to keep my comments inside the code for this one.
impl State {
    /// Returns the nearest wall the ray intersects with on a horizontal grid line.
    fn horizontal_intersection(&self, angle: f32) -> f32 {
        // This tells you if the angle is "facing up"
        // regardless of how big the angle is.
        let up = fabsf(floorf(angle / PI) % 2.0) != 0.0;

        // first_y and first_x are the first grid intersections
        // that the ray intersects with.
        let first_y = if up {
            ceilf(self.player_y) - self.player_y
        } else {
            floorf(self.player_y) - self.player_y
        };
        let first_x = -first_y / tanf(angle);

        // dy and dx are the "ray extension" values mentioned earlier.
        let dy = if up { 1.0 } else { -1.0 };
        let dx = -dy / tanf(angle);

        // next_x and next_y are mutable values which will keep track
        // of how far away the ray is from the player.
        let mut next_x = first_x;
        let mut next_y = first_y;

        // This is the loop where the ray is extended until it hits
        // the wall. It's not an infinite loop as implied in the
        // explanation, instead it only goes from 0 to 256.
        //
        // This was chosen because if something goes wrong and the
        // ray never hits a wall (which should never happen) the
        // loop will eventually break and the game will keep on running.
        for _ in 0..256 {
            // current_x and current_y are where the ray is currently
            // on the map, while next_x and next_y are relative
            // coordinates, current_x and current_y are absolute
            // points.
            let current_x = next_x + self.player_x;
            let current_y = if up {
                next_y + self.player_y
            } else {
                next_y + self.player_y - 1.0
            };

            // Tell the loop to quit if we've just hit a wall.
            if point_in_wall(current_x, current_y) {
                break;
            }

            // if we didn't hit a wall on this extension add
            // dx and dy to our current position and keep going.
            next_x += dx;
            next_y += dy;
        }

        // return the distance from next_x and next_y to the player.
        distance(next_x, next_y)
    }
}
Vertical Intersections
Let's also implement vertical intersections before drawing the walls.
You'll notice that this function is almost identical to the last one.
Let's add a method inside of State called vertical_intersection to match horizontal_intersection:
impl State {
    /// Returns the nearest wall the ray intersects with on a vertical grid line.
    fn vertical_intersection(&self, angle: f32) -> f32 {
        // This tells you if the angle is "facing up"
        // regardless of how big the angle is.
        let right = fabsf(floorf((angle - FRAC_PI_2) / PI) % 2.0) != 0.0;

        // first_y and first_x are the first grid intersections
        // that the ray intersects with.
        let first_x = if right {
            ceilf(self.player_x) - self.player_x
        } else {
            floorf(self.player_x) - self.player_x
        };
        let first_y = -tanf(angle) * first_x;

        // dy and dx are the "ray extension" values mentioned earlier.
        let dx = if right { 1.0 } else { -1.0 };
        let dy = dx * -tanf(angle);

        // next_x and next_y are mutable values which will keep track
        // of how far away the ray is from the player.
        let mut next_x = first_x;
        let mut next_y = first_y;

        // This is the loop where the ray is extended until it hits
        // the wall. It's not an infinite loop as implied in the
        // explanation, instead it only goes from 0 to 256.
        //
        // This was chosen because if something goes wrong and the
        // ray never hits a wall (which should never happen) the
        // loop will eventually quit and the game will keep on running.
        for _ in 0..256 {
            // current_x and current_y are where the ray is currently
            // on the map, while next_x and next_y are relative
            // coordinates, current_x and current_y are absolute
            // points.
            let current_x = if right {
                next_x + self.player_x
            } else {
                next_x + self.player_x - 1.0
            };
            let current_y = next_y + self.player_y;

            // Tell the loop to quit if we've just hit a wall.
            if point_in_wall(current_x, current_y) {
                break;
            }

            // if we didn't hit a wall on this extension add
            // dx and dy to our current position and keep going.
            next_x += dx;
            next_y += dy;
        }

        // return the distance from next_x and next_y to the player.
        distance(next_x, next_y)
    }
}
Getting The View
So far we haven't written anything we can interact with. Well, we can act on it (move the character), but we can't see what we're doing. Let's try drawing the walls.
If you remember from the summary, we have to draw vertical lines for every column on the window.
We can split this up into two separate jobs: getting the heights of the lines and actually drawing them on the screen.
Why not do this all at once?
Well, vline is unsafe so we should keep it in fn update.
Let's do this by defining State::get_view which returns a list of all the wall heights.
Then, on each frame, we can call State::get_view from fn update and draw all of those vertical lines we just calculated.
#[no_mangle]
unsafe fn update() {
    STATE.update(
        *GAMEPAD1 & BUTTON_UP != 0,
        *GAMEPAD1 & BUTTON_DOWN != 0,
        *GAMEPAD1 & BUTTON_LEFT != 0,
        *GAMEPAD1 & BUTTON_RIGHT != 0,
    );

    // go through each column on screen and draw walls in the center.
    for (x, wall_height) in STATE.get_view().iter().enumerate() {
        vline(x as i32, 80 - (wall_height / 2), *wall_height as u32);
    }
}
State::get_view will work by going through each vertical line on the screen (all 160), calculating the angle offset from the player's point of view, then finding the distance to the closest horizontal and vertical intersections with walls in the ray's path.
Then it compares the two distances and turns the smaller of the two into the height of a wall.
I know that sounds complicated so let's go ahead and write out what that looks like.
First, let's create some constants which define our player's perspective:
const FOV: f32 = PI / 2.7; // The player's field of view.
const HALF_FOV: f32 = FOV * 0.5; // Half the player's field of view.
const ANGLE_STEP: f32 = FOV / 160.0; // The angle between each ray.
const WALL_HEIGHT: f32 = 100.0; // A magic number.
WALL_HEIGHTis the height, in pixels, the wall will appear as when it is one unit away.
Now, let's add get_view to our existing State impl block:
impl State {
    /// Returns 160 wall heights from the player's perspective.
    pub fn get_view(&self) -> [i32; 160] {
        // The player's FOV is split in half by their viewing angle.
        // In order to get the ray's first angle we must
        // add half the FOV to the player's angle to get
        // the edge of the player's FOV.
        let starting_angle = self.player_angle + HALF_FOV;

        let mut walls = [0; 160];

        for (idx, wall) in walls.iter_mut().enumerate() {
            // `idx` is what number ray we are, `wall` is
            // a mutable reference to a value in `walls`.
            let angle = starting_angle - idx as f32 * ANGLE_STEP;

            // Get both the closest horizontal and vertical wall
            // intersections for this angle.
            let h_dist = self.horizontal_intersection(angle);
            let v_dist = self.vertical_intersection(angle);

            // Get the minimum of the two distances and
            // "convert" it into a wall height.
            *wall = (WALL_HEIGHT / f32::min(h_dist, v_dist)) as i32;
        }

        walls
    }
}
Looks good, let's try running it! You can use the arrow keys on your keyboard to move the player around.

Wow, we were able to create the illusion of depth! This is pretty impressive for our first try. Most tutorials stop here, but there are some problems we need to work out.
Fixing The Perspective
When walking around you might notice that everything looks... wrong. Walls bend away from you as if you were looking through a fisheye lens.
This is because our algorithm's assumption that human vision converges on a single infinitely small point (the player) is wrong. In reality, our visual cortex is constantly blending the perspective of both of our eyes to create depth.
In this case a much more accurate metaphor is a plane perpendicular to our perspective sending out the rays:

Of course this is pretty vague, but if you think of it as "fisheye correction" maybe that'll help. To apply this "fisheye correction" we have to multiply the distance by the cosine of difference between the ray's angle and the player's angle:
$$ H= \frac{C}{D \times \cos(\Delta \theta)} $$
Where $H$ is the wall height in pixels, $D$ is the distance to the wall, and $ \Delta\theta$ is the difference between the ray's angle and the player's angle.
All we have to do to apply this is to modify a single line in the State::get_view function:
*wall = ( WALL_HEIGHT / (f32::min(h_dist, v_dist) * cosf(angle - self.player_angle)) ) as i32;

Great! Now the walls are straight.
Adding Some Depth
One thing about the current version of the game is that it is difficult to distinguish between different walls. Especially at a distance, walls seem to fade into each other and it's hard to tell them apart.

In real life, we can distinguish walls apart by their shadows. We can try to emulate this in the game by coloring walls differently based on their orientation. Luckily for us, we already know which walls are "east/west facing" and which are "north/south facing" because of what axis our rays intersected with them! Knowing this, it's fairly easy to assign different colors to walls.
WASM-4 has a very unique way of setting which color its functions use to draw.
Every time a draw function is called in WASM-4 it decides what color to use based on an index kept a bit of memory called DRAW_COLORS.
WASM-4 makes changing DRAW_COLORS easy, we can set it by using simple hex notation.
Let's add DRAW_COLORS next to GAMEPAD1 at the top of our file:
const DRAW_COLORS: *mut u16 = 0x14 as *mut u16;
const GAMEPAD1: *const u8 = 0x16 as *const u8;
Now, in State::get_view, we can rewrite it to pass along if the wall should be drawn "with a shadow" or not:
impl State {
    /// Returns 160 wall heights and their "color" from the player's perspective.
    pub fn get_view(&self) -> [(i32, bool); 160] {
        // The player's FOV is split in half by their viewing angle.
        // In order to get the ray's starting angle we must
        // add half the FOV to the player's angle to get
        // the edge of the player's FOV.
        let starting_angle = self.player_angle + HALF_FOV;

        let mut walls = [(0, false); 160];

        for (idx, wall) in walls.iter_mut().enumerate() {
            // `idx` is what number ray we are, `wall` is
            // a mutable reference to a value in `walls`.
            let angle = starting_angle - idx as f32 * ANGLE_STEP;

            // Get both the closest horizontal and vertical wall
            // intersections for this angle.
            let h_dist = self.horizontal_intersection(angle);
            let v_dist = self.vertical_intersection(angle);

            let (min_dist, shadow) = if h_dist < v_dist {
                (h_dist, false)
            } else {
                (v_dist, true)
            };

            // Get the minimum of the two distances and
            // "convert" it into a wall height.
            *wall = (
                (WALL_HEIGHT / (min_dist * cosf(angle - self.player_angle))) as i32,
                shadow,
            );
        }

        walls
    }
}
Now let's make these changes in fn update:
#[no_mangle]
unsafe fn update() {
    STATE.update(
        *GAMEPAD1 & BUTTON_UP != 0,
        *GAMEPAD1 & BUTTON_DOWN != 0,
        *GAMEPAD1 & BUTTON_LEFT != 0,
        *GAMEPAD1 & BUTTON_RIGHT != 0,
    );

    // Go through each column on screen and draw walls in the center.
    for (x, wall) in STATE.get_view().iter().enumerate() {
        let (height, shadow) = wall;

        if *shadow {
            // draw with color 2 for walls with "shadow"
            *DRAW_COLORS = 0x2;
        } else {
            // draw with color 3 for walls without "shadow"
            *DRAW_COLORS = 0x3;
        }

        vline(x as i32, 80 - (height / 2), *height as u32);
    }
}
Lets try running it:

Wow, that looks much better. Even though shadows in real life don't act like this it adds some good detail and helps create the illusion of depth.
Making It Smaller!
If you were to check the size of the program right now, say by calling du -bh, you might get something like this:
 $ du -bh target/wasm32-unknown-unknown/release/raycaster.wasm
12K  target/wasm32-unknown-unknown/release/raycaster.wasm
This is nowhere near the 2K executable I promised in the title, so how are we going to get there?
One way you can reduce the size of .wasm files is by using wasm-opt.
You can usually get wasm-opt by installing the binaryen package.
wasm-opt was specifically designed to optimize .wasm files for size by removing dead code and duplicate instructions that the compiler left behind.
Let's try using wasm-opt to reduce the size of the .wasm:
 $ wasm-opt -Oz target/wasm32-unknown-unknown/release/raycaster.wasm \
    -o target/wasm32-unknown-unknown/release/raycaster.wasm
 $ du -bh target/wasm32-unknown-unknown/release/raycaster.wasm
7.4K  target/wasm32-unknown-unknown/release/raycaster.wasm
Hmmm, not quite enough.
Somehow Even Smaller?!
If you were to look into the executable you'd probably see that most of the space is being taken up by functions we imported from libm.
The final step requires we remove libm completely and replace it with our own implementation.
Let's start by deleting the old libm import statement and removing it from Cargo.toml.
After that we can add an approximation of the sinf function using Bhaskara I's sin approximation and redefine cosf and tanf in terms of it.
$$ \sin(x) \approx \frac{16x(\pi-x)}{5\pi^2-4x(\pi-x)} \text{ when } (0 \le x \le \pi) $$
This approximation is very good, especially for the time it was discovered :).
And because we're operating with wall heights only between integers 0 and 160, any differences between libm::sinf and our sinf will be indistinguishable.
First, make sure to also import $\tau$ from the core library and define a constant for $5\pi^2$ which Bhaskara I's approximation uses:
use core::f32::consts::{FRAC_PI_2, PI, TAU};

const FIVE_PI_SQUARED: f32 = 5.0 * (PI * PI);
Then, let's add our new sinf[^3]:
fn sinf(mut x: f32) -> f32 {
    let y = x / TAU;
    let z = y - floorf(y);
    x = z * TAU;

    let sinf_imp = |x: f32| -> f32 {
        // these magic numbers were discovered 1400 years ago!
        (16.0 * x * (PI - x)) / (FIVE_PI_SQUARED - (4.0 * x * (PI - x)))
    };

    if x > PI {
        -sinf_imp(x - PI)
    } else {
        sinf_imp(x)
    }
}
Thanks to Cyborus04 for helping me with this
sinffunction.
Now we can create cosf and tanf functions from their definitions relating to sinf:
$\cos(x) = \sin(x + \frac{\pi}{2})$
fn cosf(x: f32) -> f32 {
    sinf(x + FRAC_PI_2)
}
$\tan(x) = \frac{\sin(x)}{\cos(x)}$
fn tanf(x: f32) -> f32 {
    sinf(x) / cosf(x)
}
Alright, now that we've replaced the libm trig functions, what about sqrtf, ceilf, floorf, and fabsf?
This is where nightly Rust is required, so make sure you've switched you've installed wasm32-unknown-unknown for nightly and build on nightly each time with +nightly:
$ rustup +nightly install wasm32-unknown-unknown
$ cargo +nightly build --release
Nightly Rust enables us to use an experimental module in the core library named core::intrinsics.
core::intrinsics provides us some functions that the compiler knows how to optimize so we don't have to write them ourself.
In order to turn on the experimental intrinsics feature, add #![feature(core_intrinsics)] to the top of your file:
#![no_main]
#![no_std]
#![feature(core_intrinsics)]
Now we can create some "safe" wrappers over the unsafe functions that core::intrinsics provides for us:
// >:)

fn sqrtf(x: f32) -> f32 {
    unsafe { core::intrinsics::sqrtf32(x) }
}

fn floorf(x: f32) -> f32 {
    unsafe { core::intrinsics::floorf32(x) }
}

fn ceilf(x: f32) -> f32 {
    unsafe { core::intrinsics::ceilf32(x) }
}

fn fabsf(x: f32) -> f32 {
    unsafe { core::intrinsics::fabsf32(x) }
}
Lets compile to and see if it works... and
# after `cargo +nightly b -r` and `wasm-opt`
$ du -bh target/wasm32-unknown-unknown/release/raycaster.wasm
2.0K	target/wasm32-unknown-unknown/release/raycaster.wasm
Conclusion
1.7K is not the smallest you can make this program. You can get this to fit in even smaller sizes and I encourage you to try! There are some sections in this code that I've even intentionally made more readable at the cost of taking up slightly more instructions than they need to just so you can optimize it :)
I wrote this post because when I was first writing my raycasted game I couldn't find any resources that explained how the algorithm worked in sane code and plain language.
I hope this was interesting and useful for you! Ray casting (like in this simple way) in FPS games was always a mystery to me before I looked into them, I hope you'll agree that the algorithm behind it is surprisingly elegant.